Migrating to Rocky Linux Operating System
This procedure describes how to migrate your Version 8.2 data to the Version 8.4 OVOC server machine running the Rocky Linux Operating system. Before starting the process:
|
■
|
Ensure that the OVOC server has been upgraded to version 8.2.3000 GA: |
'EmsServerManager' has been renamed to 'OvocServerManager'. Both command strings can be typed in the SSH console.
|
1.
|
Download the DVD3-OVOC Server Application Installation ISO file containing the Rocky Linux Operating system to your PC. |
|
2.
|
Using the WinSCP utility (see Transferring Files) transfer the DVD3.ISO file to the OVOC Version 8.2 server acems user home directory: /home/acems
|
|
3.
|
Login into the OVOC server Version 8.2 machine by SSH, as 'acems' user, and enter the password acems. |
|
4.
|
Switch to 'root' user and provide root password (default password is root): |
su - root
|
5.
|
Verify that the folder /mnt exists, and if not then create it: |
mkdir /mnt
|
6.
|
Mount the ISO to make it available: |
mount /home/acems/DVD3_EMS_XXX.iso /mnt
|
7.
|
Change directory to the script location: |
cd /mnt/EmsServerInstall/
|
8.
|
Run the installation script: |
perl upgrade_DBs_centos.pl
|
9.
|
Change directory to the location of the OVOC backup archives: |
cd /data/NBIF/emsBackup

|
10.
|
Copy the following archives: EMSServerBackup, ovocFullBackup and cassandraBackup to your PC. |
|
11.
|
On Version 8.2 server, copy /opt/ssl/aes/keystore.jckes to /home/acems/ and then to your PC. |
cp /opt/ssl/aes/keystore.jckes /home/acems/keystore.jckes
|
12.
|
Perform OVOC Version 8.4 clean installation on the same server or on another server: |
|
13.
|
Login into the OVOC server Version 8.4 machine by SSH, as 'acems' user, and then enter the password acems. |
|
14.
|
Switch to 'root' user and provide root password (default password is root): |
su - root
|
15.
|
Transfer the archive files using the WinSCP utility (see Transferring Files) to /data/NBIF/ directory. |
|
16.
|
Transfer keystore.jckes from your pc to /home/acems/keystore.jckes on new version 8.4 server. |
|
17.
|
Move /home/acems/keystore.jckes to /opt/ssl/aes/keystore.jckes: |
mv /opt/ssl/aes/keystore.jckes /opt/ssl/aes/keystore.jckes-bk
mv /home/acems/keystore.jckes /opt/ssl/aes/keystore.jckes
|
18.
|
Start the OVOC Server Manager utility by specifying the following command: |
# OvocServerManager
|
19.
|
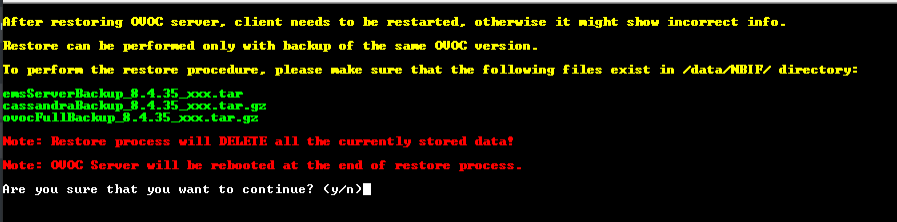
Run the option 'Restore from CentOS' (Application Maintenance menu > Restore) (see Restore from Rocky Linux version 8.x). At the end of the process, the OVOC server is rebooted. |
The restore process may take a few minutes.